Connect Grok to GitHub: One Sentence, and the AI Creates the Repo and Pushes the Files (Tested on the Free Tier)
Connect GitHub under 'Skills & Connectors' on grok.com, then type one plain sentence — 'write a website introducing a CLI tool and upload it to a github repo' — and Grok creates the repo, writes the files, and pushes them. Includes how to scope the GitHub permissions safely, plus free-tier test results from 2026-07-21.
 卡住很正常——點段落旁的 😵 卡關 讓我們知道,或直接往下滾到問答區發問。
也可以用 👍 看懂 / 😢 看不懂 告訴我們哪裡寫得好、哪裡要改。
卡住很正常——點段落旁的 😵 卡關 讓我們知道,或直接往下滾到問答區發問。
也可以用 👍 看懂 / 😢 看不懂 告訴我們哪裡寫得好、哪裡要改。
In one line: Go to grok.com/connectors, switch to the Connectors tab, click GitHub → Connect → on the GitHub page choose which repos to expose and authorize → back in Grok, start a new chat and type “write a website about X and upload it to a github repo.” It creates the repo, writes the files, and pushes them for you.
Keywords: Grok, GitHub, connector, MCP, create repo, authorization, GitHub App, GitHub Pages, free tier
Why connect an AI to GitHub at all?
You’ve probably done this dance: you ask an AI to build a web page, it produces a full HTML file, and then you copy it, paste it into an editor, save it, open GitHub, create a repo, upload the file, and go turn on Pages in Settings. The AI does one unit of work; you do nine.
Connect GitHub and those nine units disappear. You type one sentence; it opens the repo, writes the files, pushes them, and hands you a URL.
This article documents a test run on 2026-07-21: the free Grok tier completed the whole thing — from one sentence to a real new repo on GitHub, in 2 minutes 14 seconds.
Before you start
- A GitHub account (don’t have one? Sign up for GitHub takes five minutes)
- A Grok account (free is fine — log in at grok.com)
xAI’s documentation states that connectors are available to all Grok users, and the free account in this test connected and executed tasks without issue.
Step 1: Open “Skills & Connectors” and switch to the Connectors tab
Log in to grok.com and look at the left sidebar — click Skills & Connectors.
Once inside, note the two tabs at the top: Skills and Connectors. It may open on Skills by default; you want Connectors. Switch over and you’ll see the featured list: GitHub, Gmail, Google Calendar, Google Drive, Box, Canva, Notion, Stripe, Vercel.
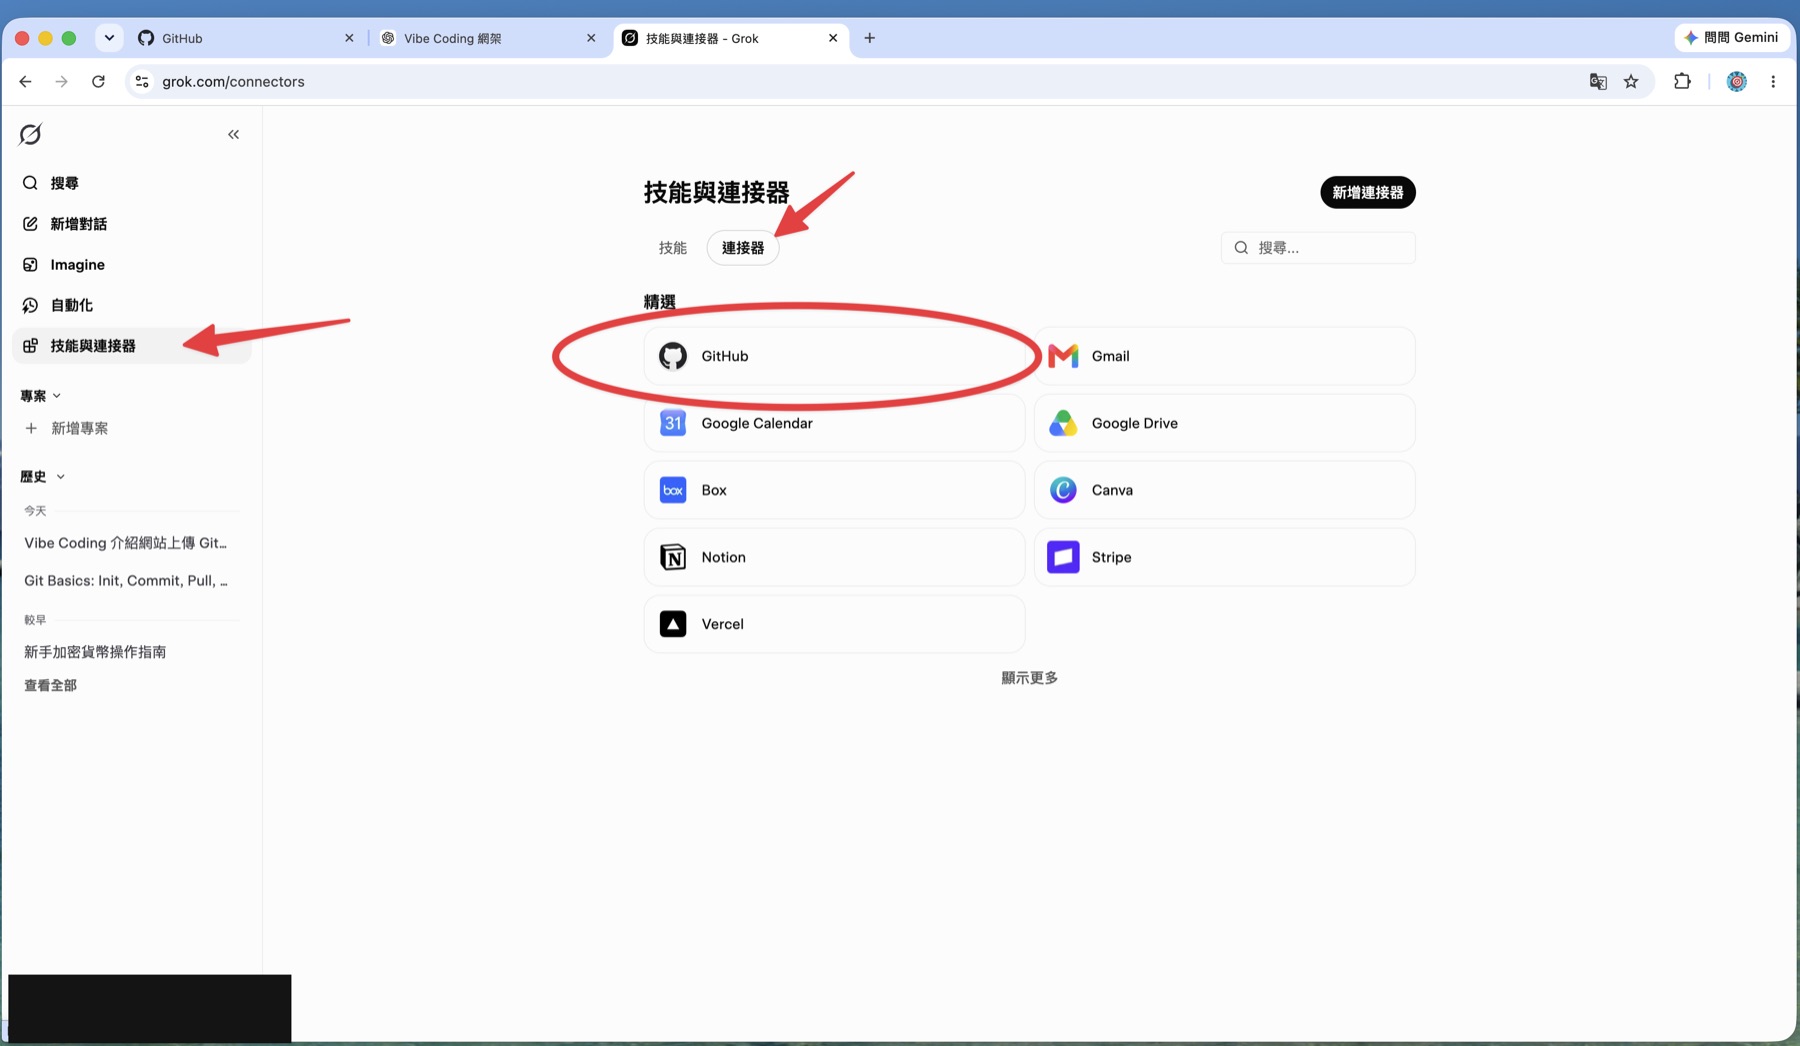
Click the GitHub card.
Step 2: Read what you’re actually connecting to
A detail card appears, and it’s worth 30 seconds of your attention:
- What it can do: search repositories and code, explore file trees, manage repositories (branches, releases, issues, PRs), view notifications, and perform actions like starring or pushing files. Note that last part — this is not read-only.
- Server URL:
https://api.githubcopilot.com/mcp/x/all. That’s GitHub’s own remote MCP server; in other words, Grok drives your GitHub through the MCP standard interface rather than through some separate xAI-built GitHub feature. - The warning: the card states plainly that third-party connectors are not built or maintained by xAI, and to be careful when granting external services access.
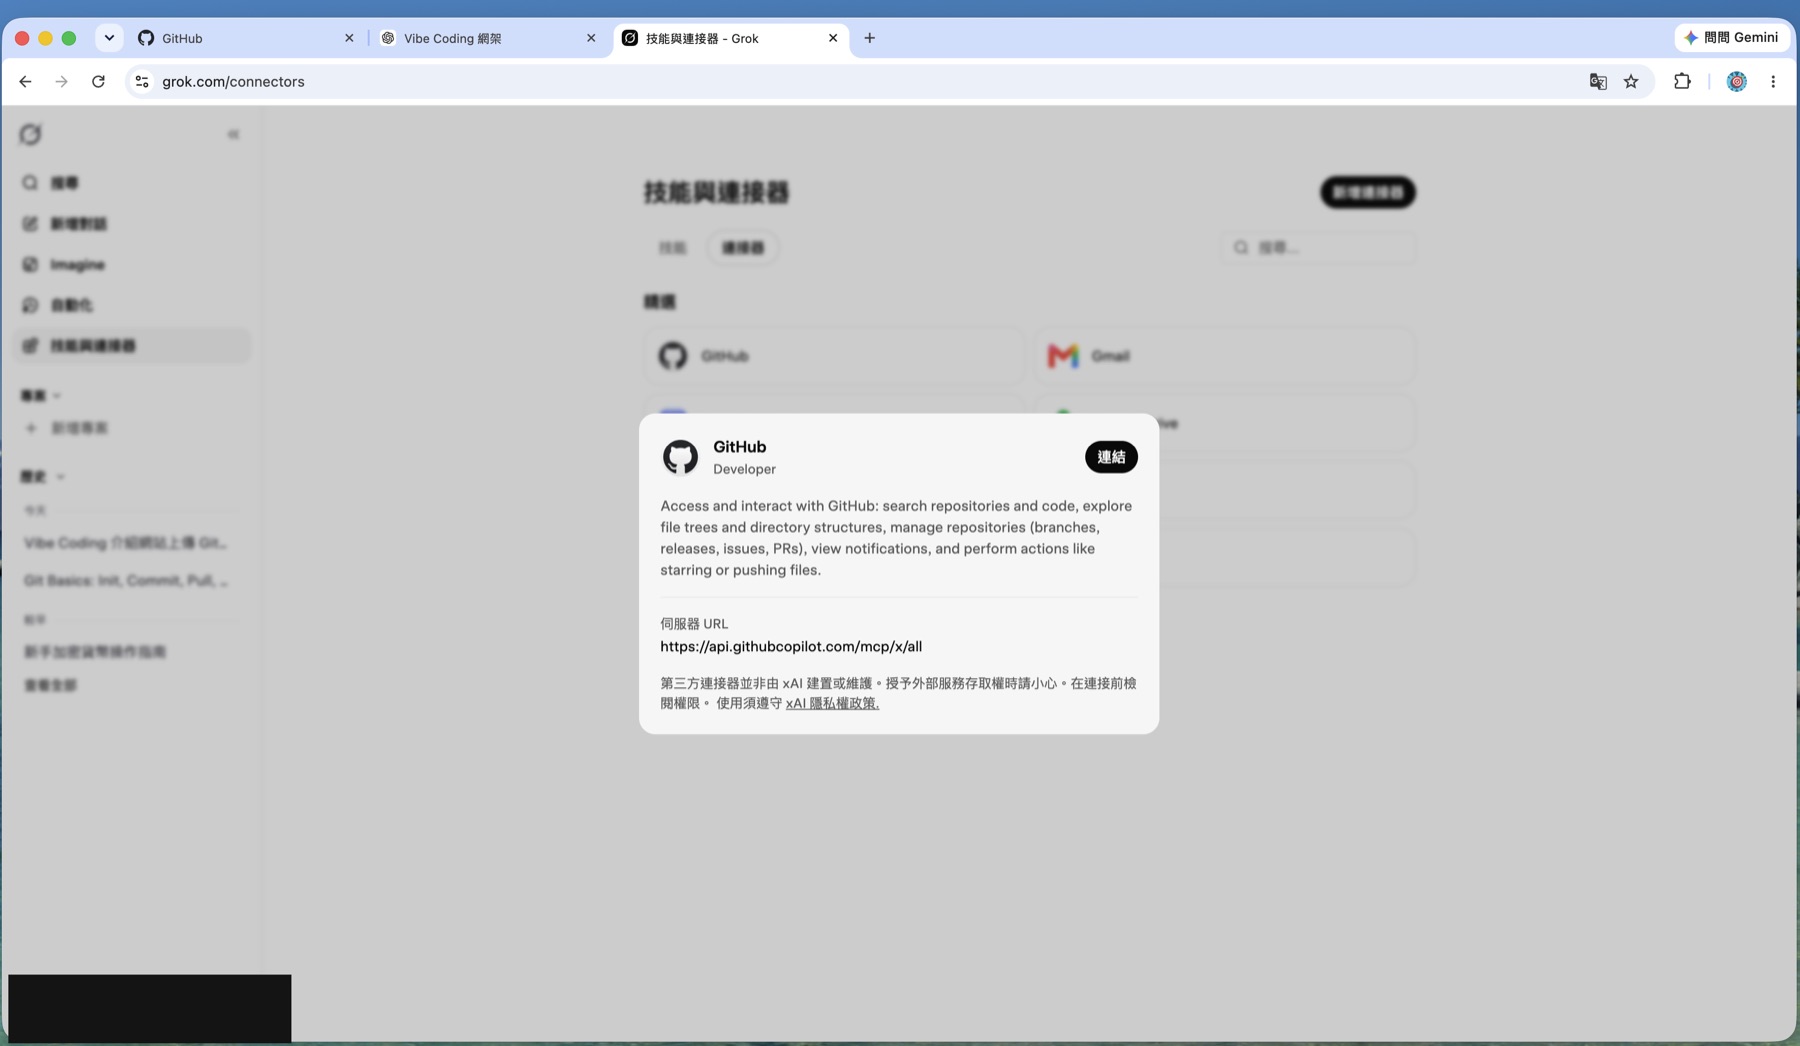
If you’re happy to proceed, click Connect in the top right.
Step 3: Decide how much access to grant ⭐
You’ll land on GitHub’s Install & Authorize Grok (by xAI) page. This is the most important screen in the whole flow — don’t click through it on autopilot.
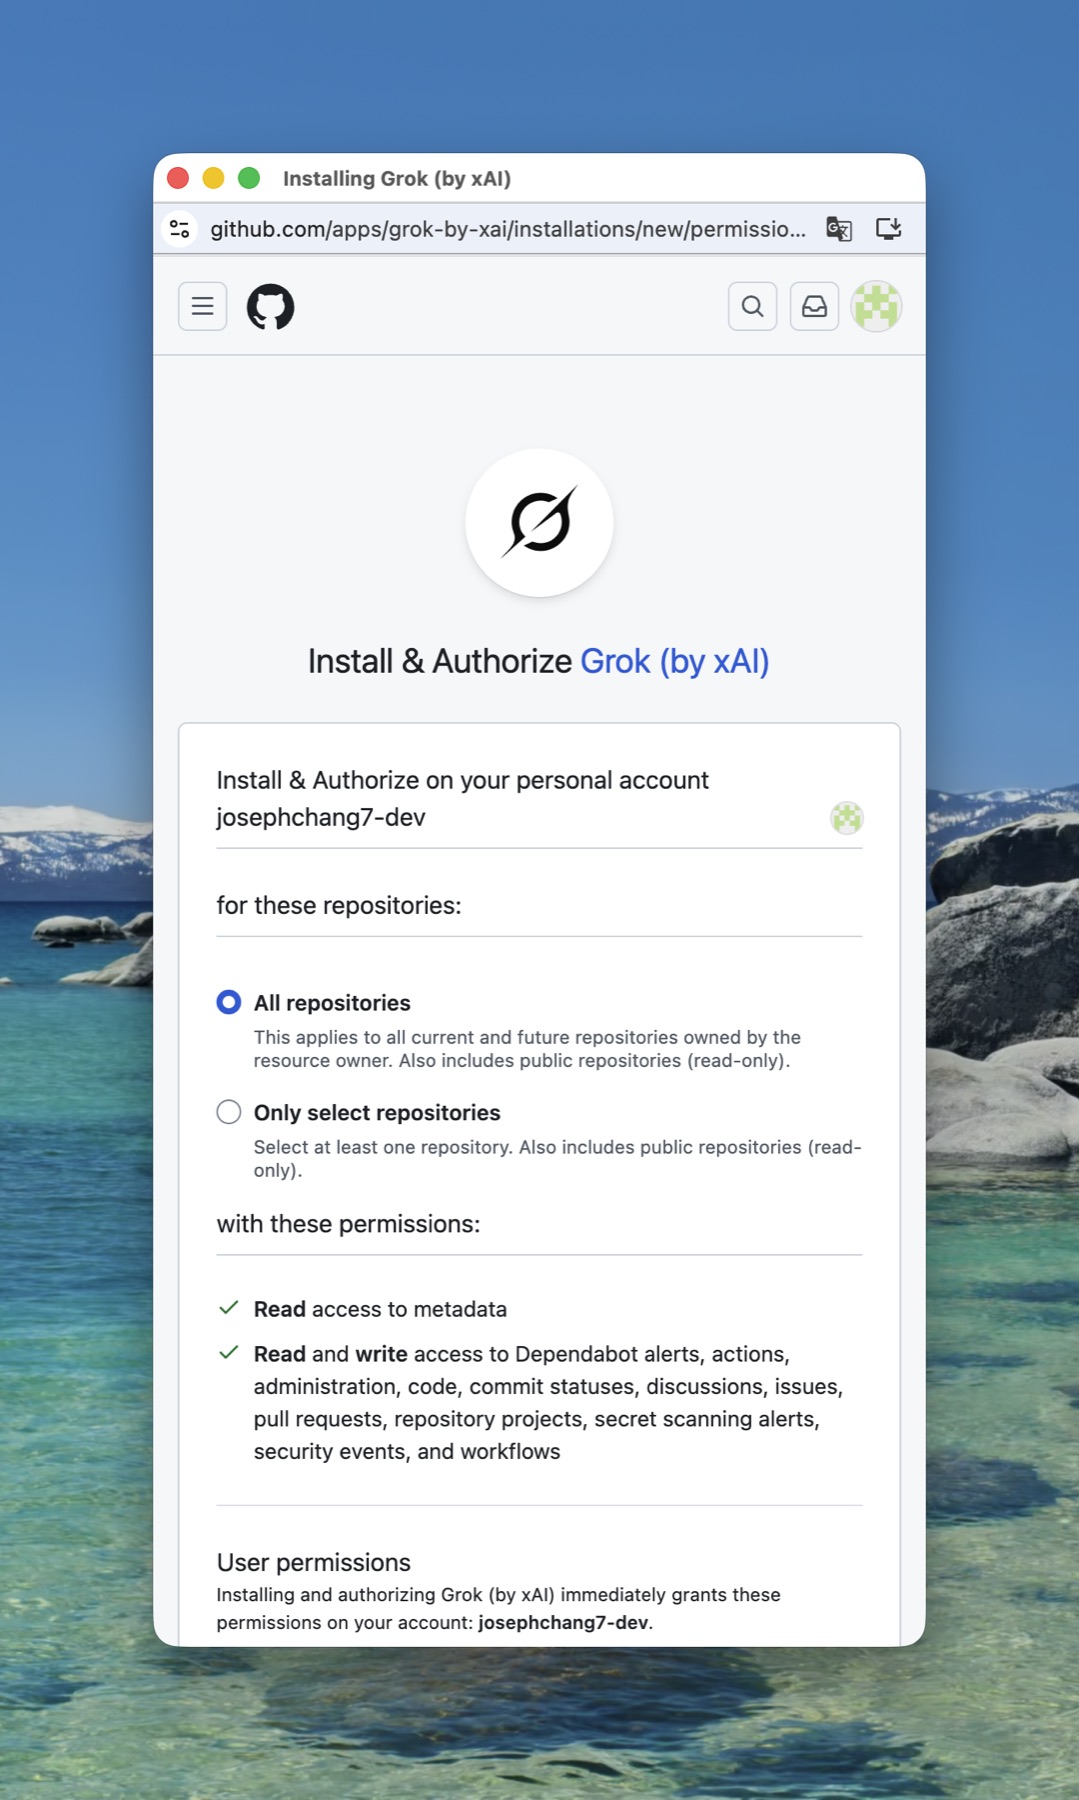
For these repositories gives you two options:
| Option | What it means | Recommendation |
|---|---|---|
| All repositories | Every repo you own now and in the future | Fine if you want convenience and have nothing sensitive in the account |
| Only select repositories | Only the repos you tick | Start here — you can widen it later at any time |
Below that, with these permissions lists: read access to metadata, plus read and write access to Dependabot alerts, actions, administration, code, commit statuses, discussions, issues, pull requests, repository projects, secret scanning alerts, security events, and workflows.
It looks alarming, but it’s the point — write access is exactly what lets it create the repo and push files for you. The question isn’t “should it be able to write,” it’s “which repos can it write to,” and that switch is the box above.
🚨 Common mistake: always picking All repositories
If your GitHub account holds work projects, client code, or private repos with config files, “All” hands over the whole keyring. While you’re experimenting, choose Only select repositories and tick one throwaway test repo. (To let it create a new repo, as in this test, you do need the broader scope — then go back to GitHub → Settings → Applications and narrow it once you’re done playing.)
Step 4: Clear GitHub’s second check (sudo mode)
For an action at this level, GitHub asks you to prove it’s really you. The screen is titled Confirm access.
Click Verify via email, then follow the link (or enter the code) in the email GitHub sends you.
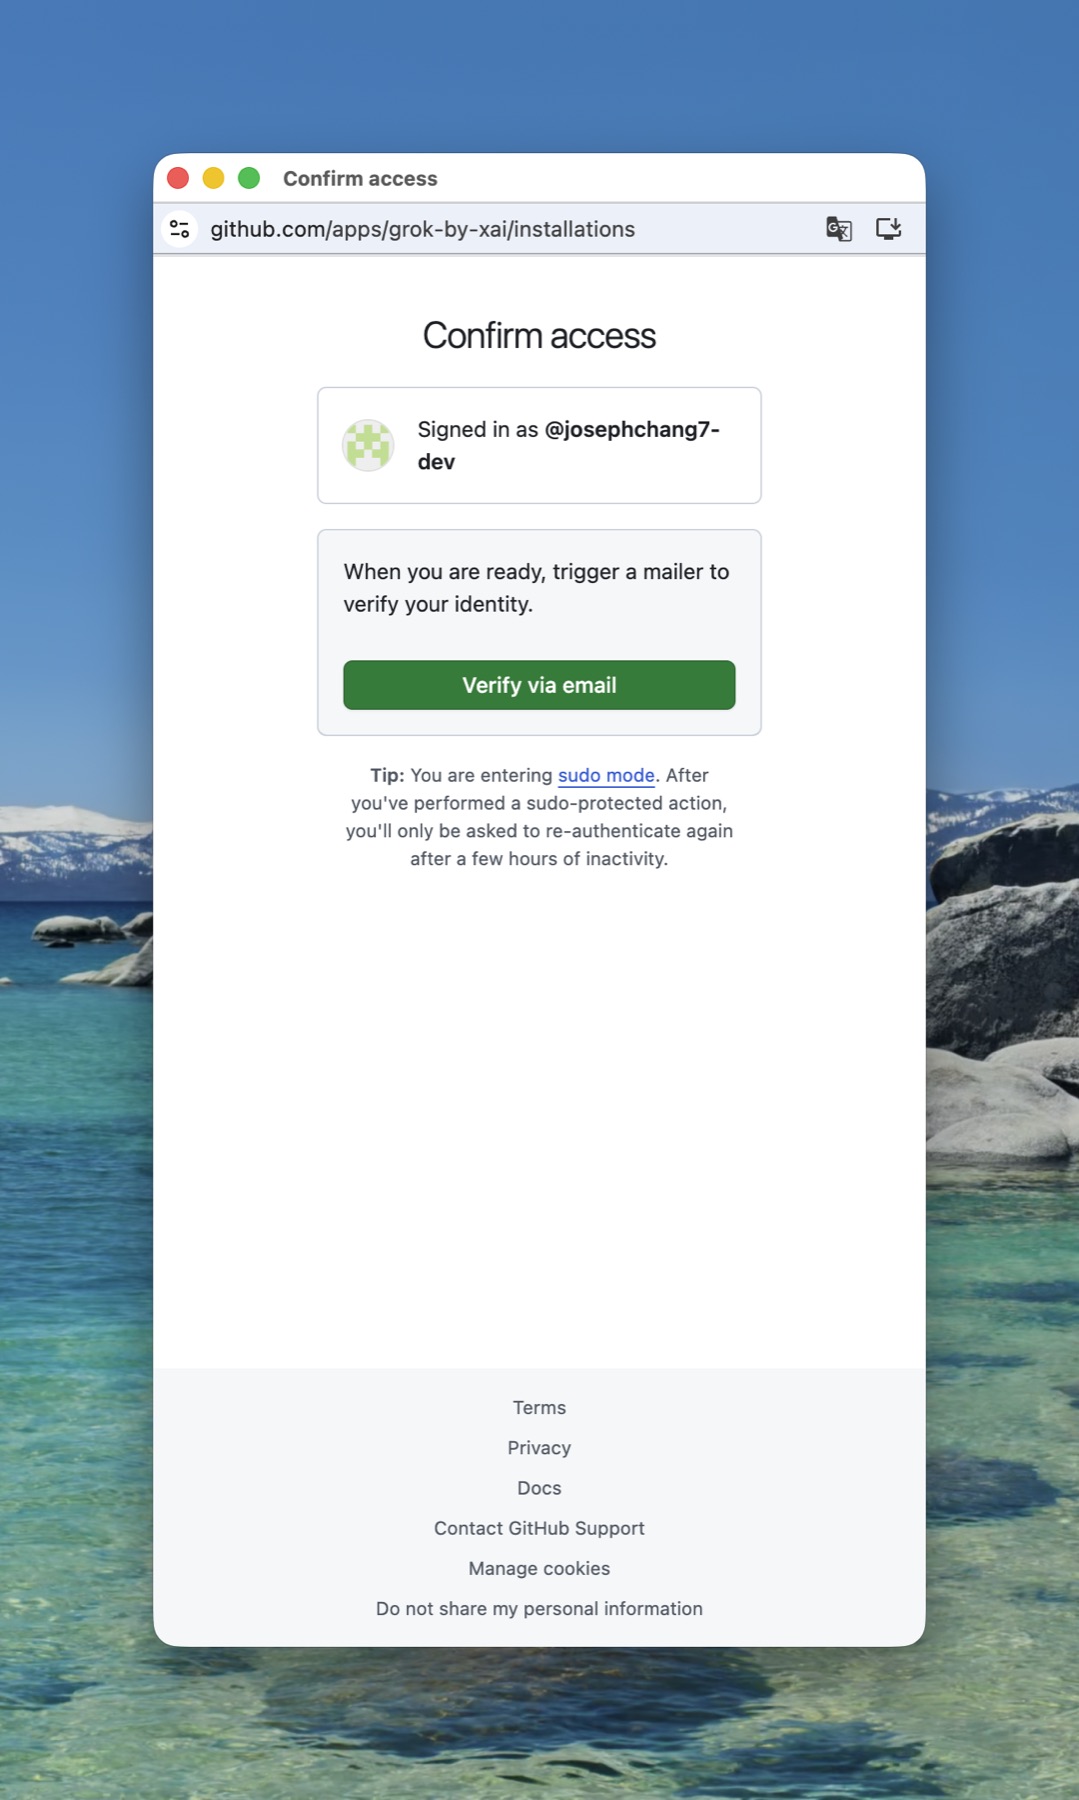
This is GitHub’s sudo mode: once cleared, you won’t be re-prompted for sensitive actions for a few hours.
Step 5: Back in Grok, confirm it’s connected
You’ll be returned to Grok automatically. Open the GitHub card again and you’ll see three changes:
- The button now reads Disconnect instead of Connect (your off switch, any time)
- A new line says all tools enabled, listing the actual tool names:
actions_get,actions_list,actions_run_trigger,add_comment_to_pending_review,add_issue_comment,add_reply_to_pull_request_comment… (click “show more” for the rest) - The server URL is still that official GitHub MCP address
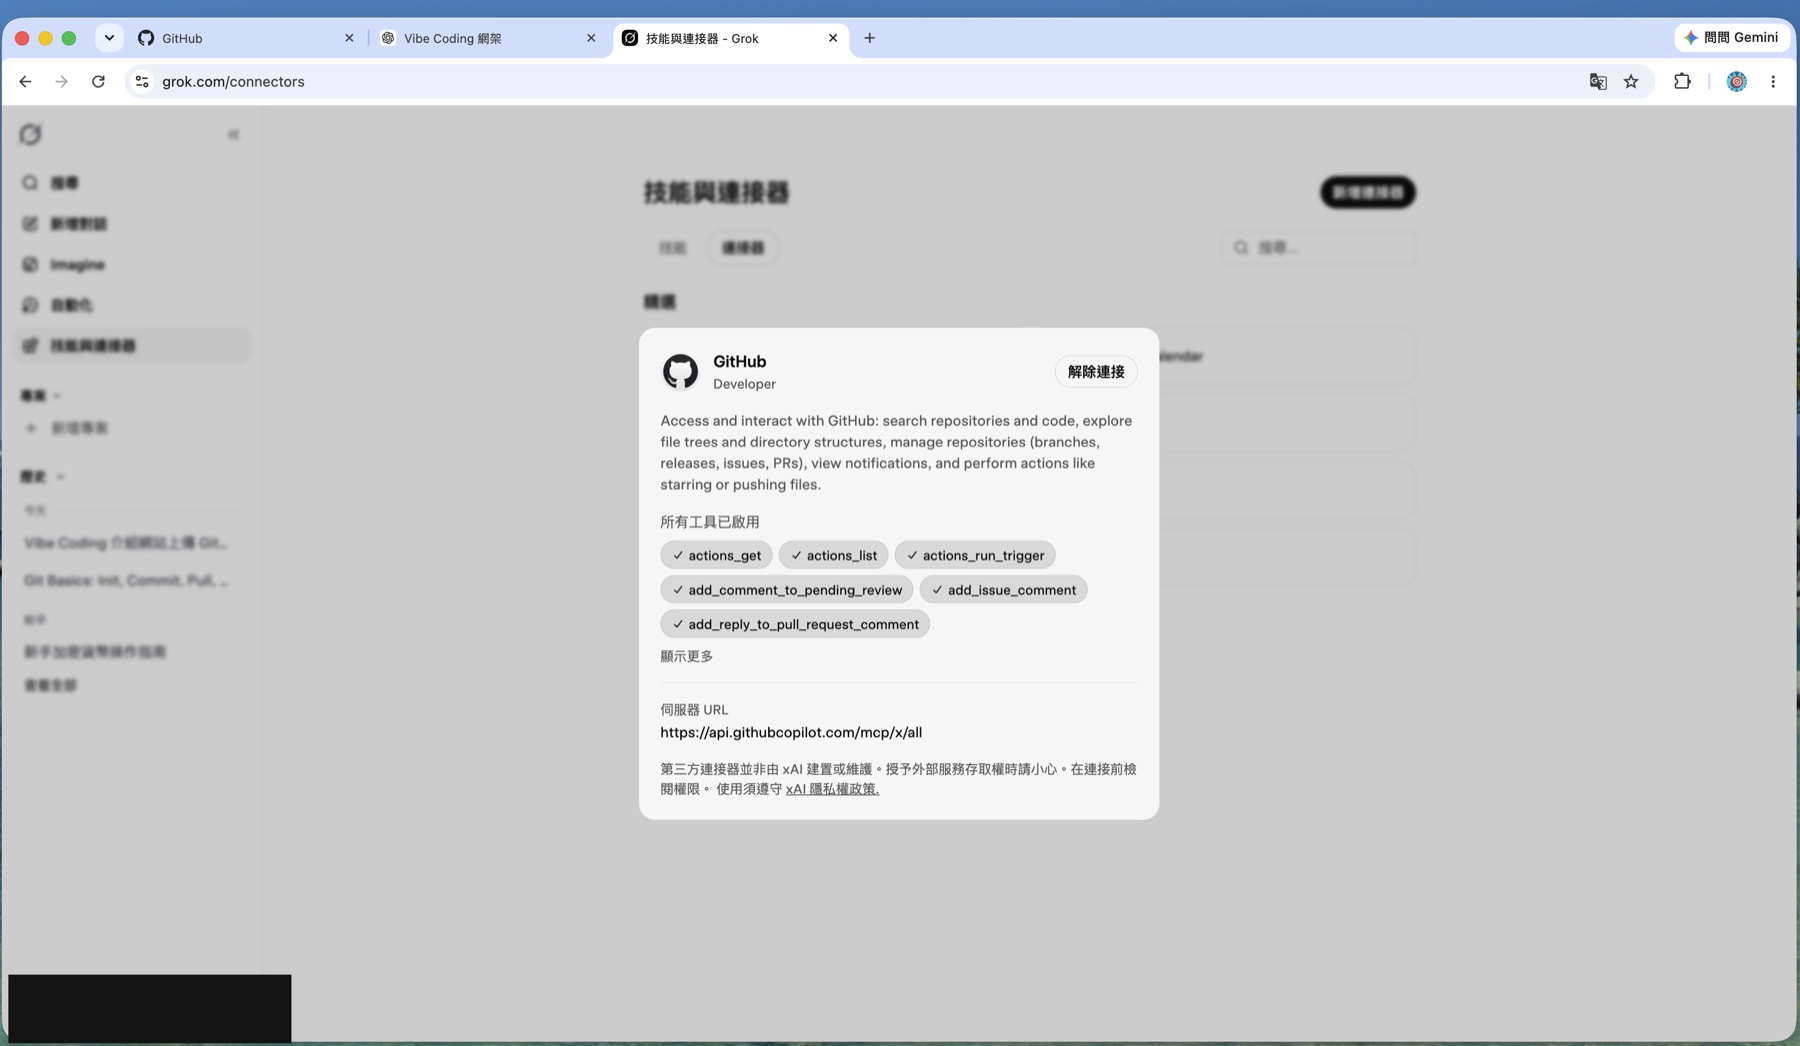
Those tool names matter — that list is the set of actions the AI actually holds in its hand, and it will pick from it in a moment.
Step 6: Give the instruction. One sentence is enough
Start a new chat and type what you want. The test used exactly this plain sentence (in Chinese):
write a website introducing a cli tool, upload it to a github repoNo framework specified, no repo name, no pasted code.
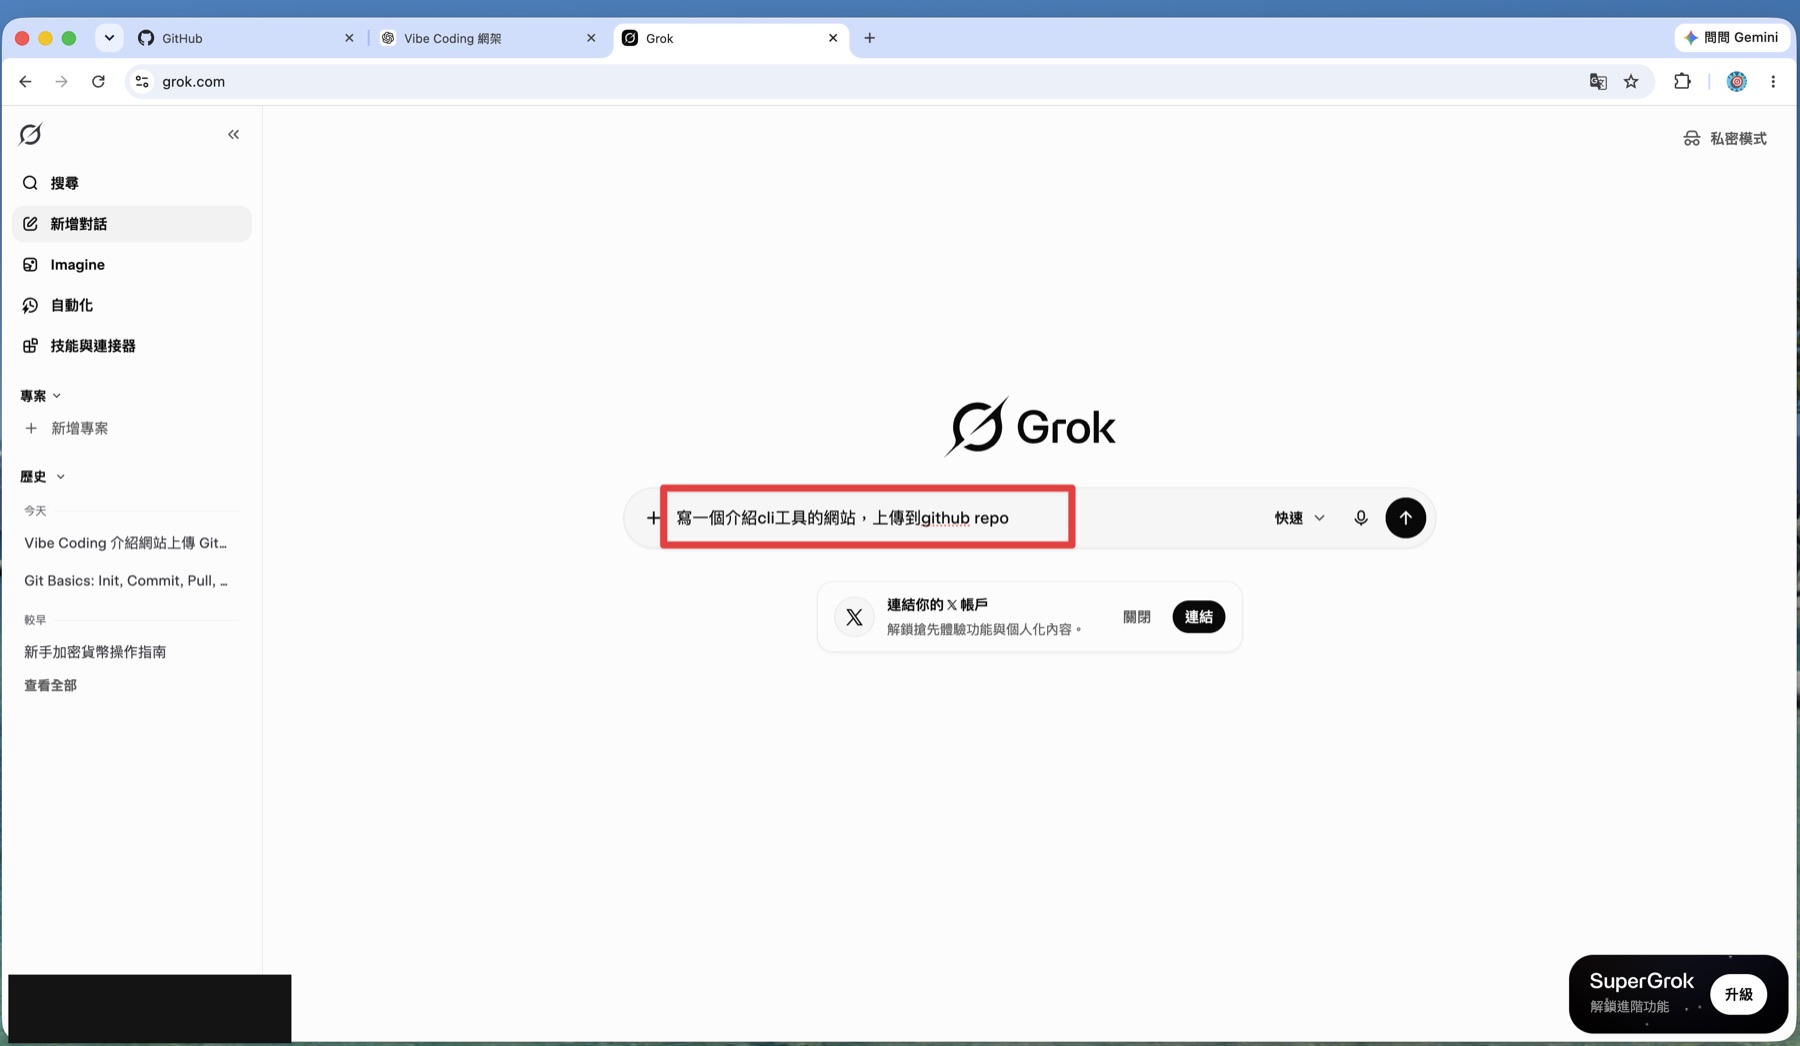
Step 7: Watch for this line — it means the AI really acted
After you send it, Grok plans first (the screen shows Designing the CLI tool website), then starts executing. Two key lines appear:
- Github Create Repository ← this line means it genuinely called GitHub’s create-repository tool
- Writing file: index.html
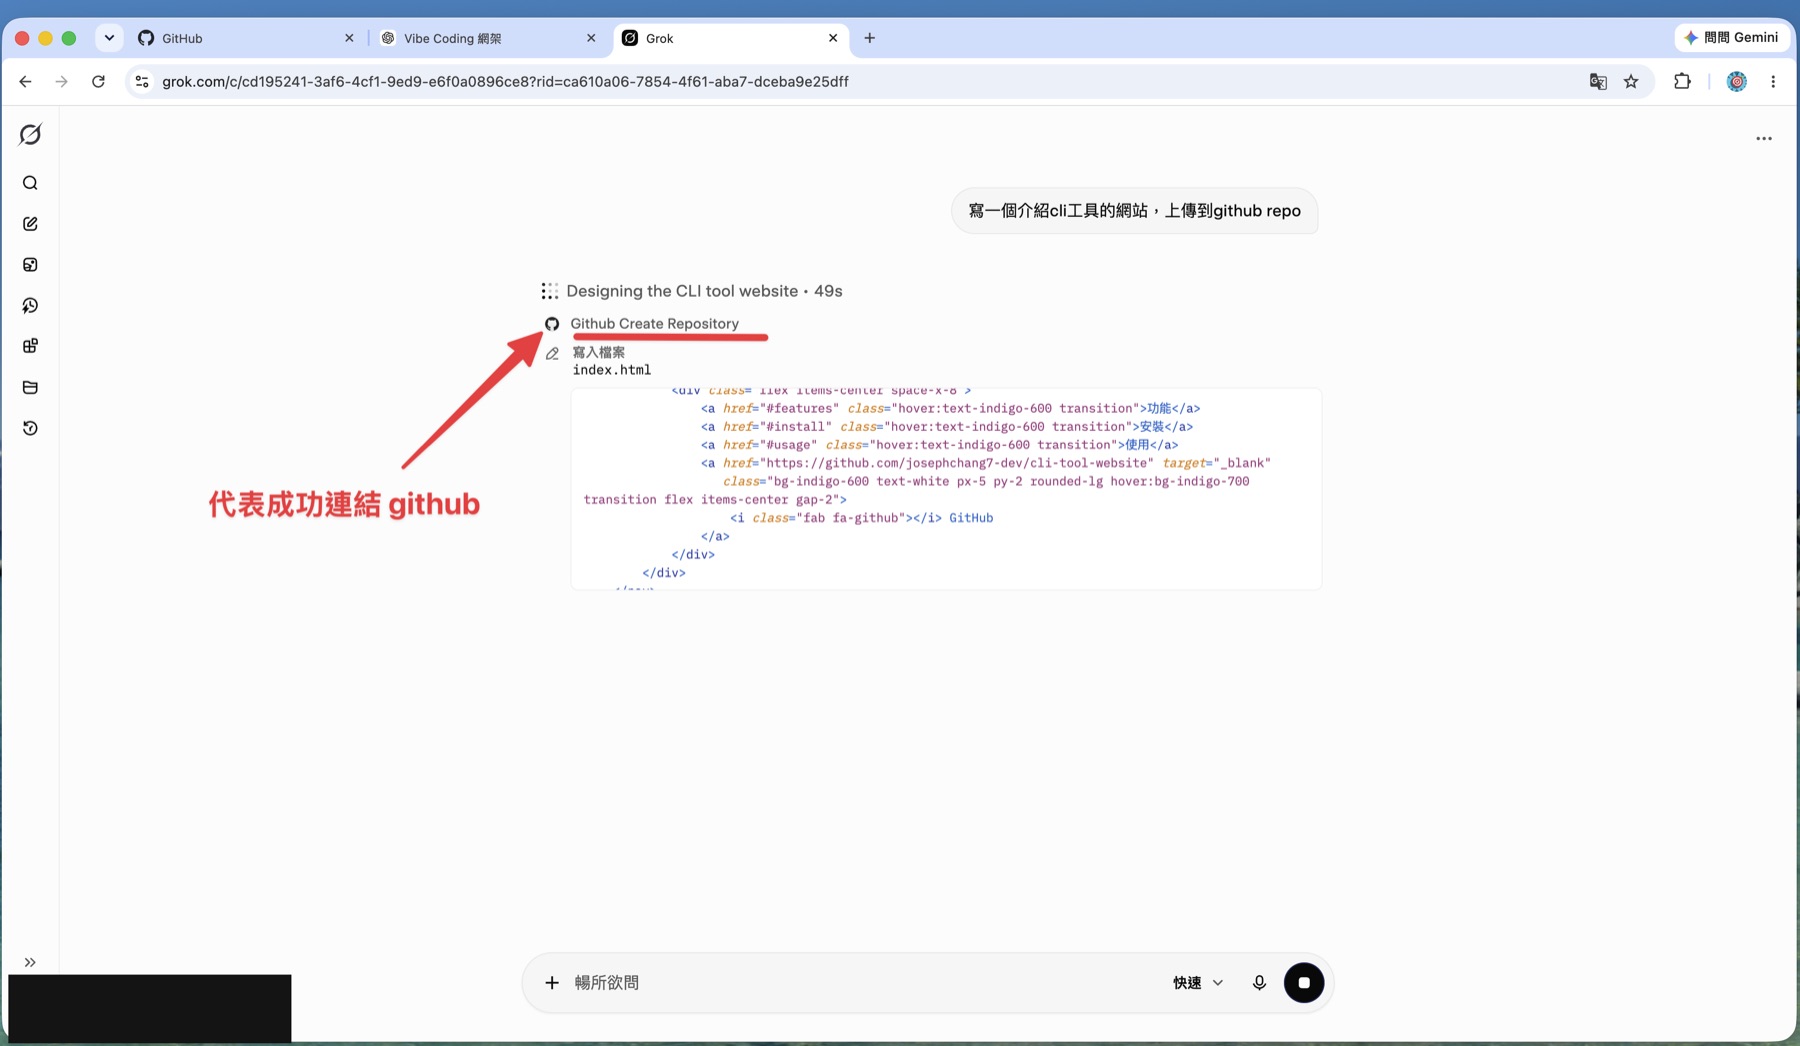
This is the most practical way to tell whether an AI actually did something: look for the tool calls, not for how confident the prose sounds. Text with no tool call means it only described the work.
Step 8: Done — with URLs and follow-up instructions
After 2 minutes 14 seconds of thinking, the test run replied “Done! 🎉” with:
- A link to the GitHub repository
- The GitHub Pages URL (once deployed)
- A helpful note: if Pages isn’t showing yet, go to Repository → Settings → Pages → Source: Deploy from a branch → main → Save
- A summary of the site (responsive, hero section, install commands, quick-start examples)
- A three-step “how to modify” guide (clone → edit
index.html→ push, and Pages updates automatically)
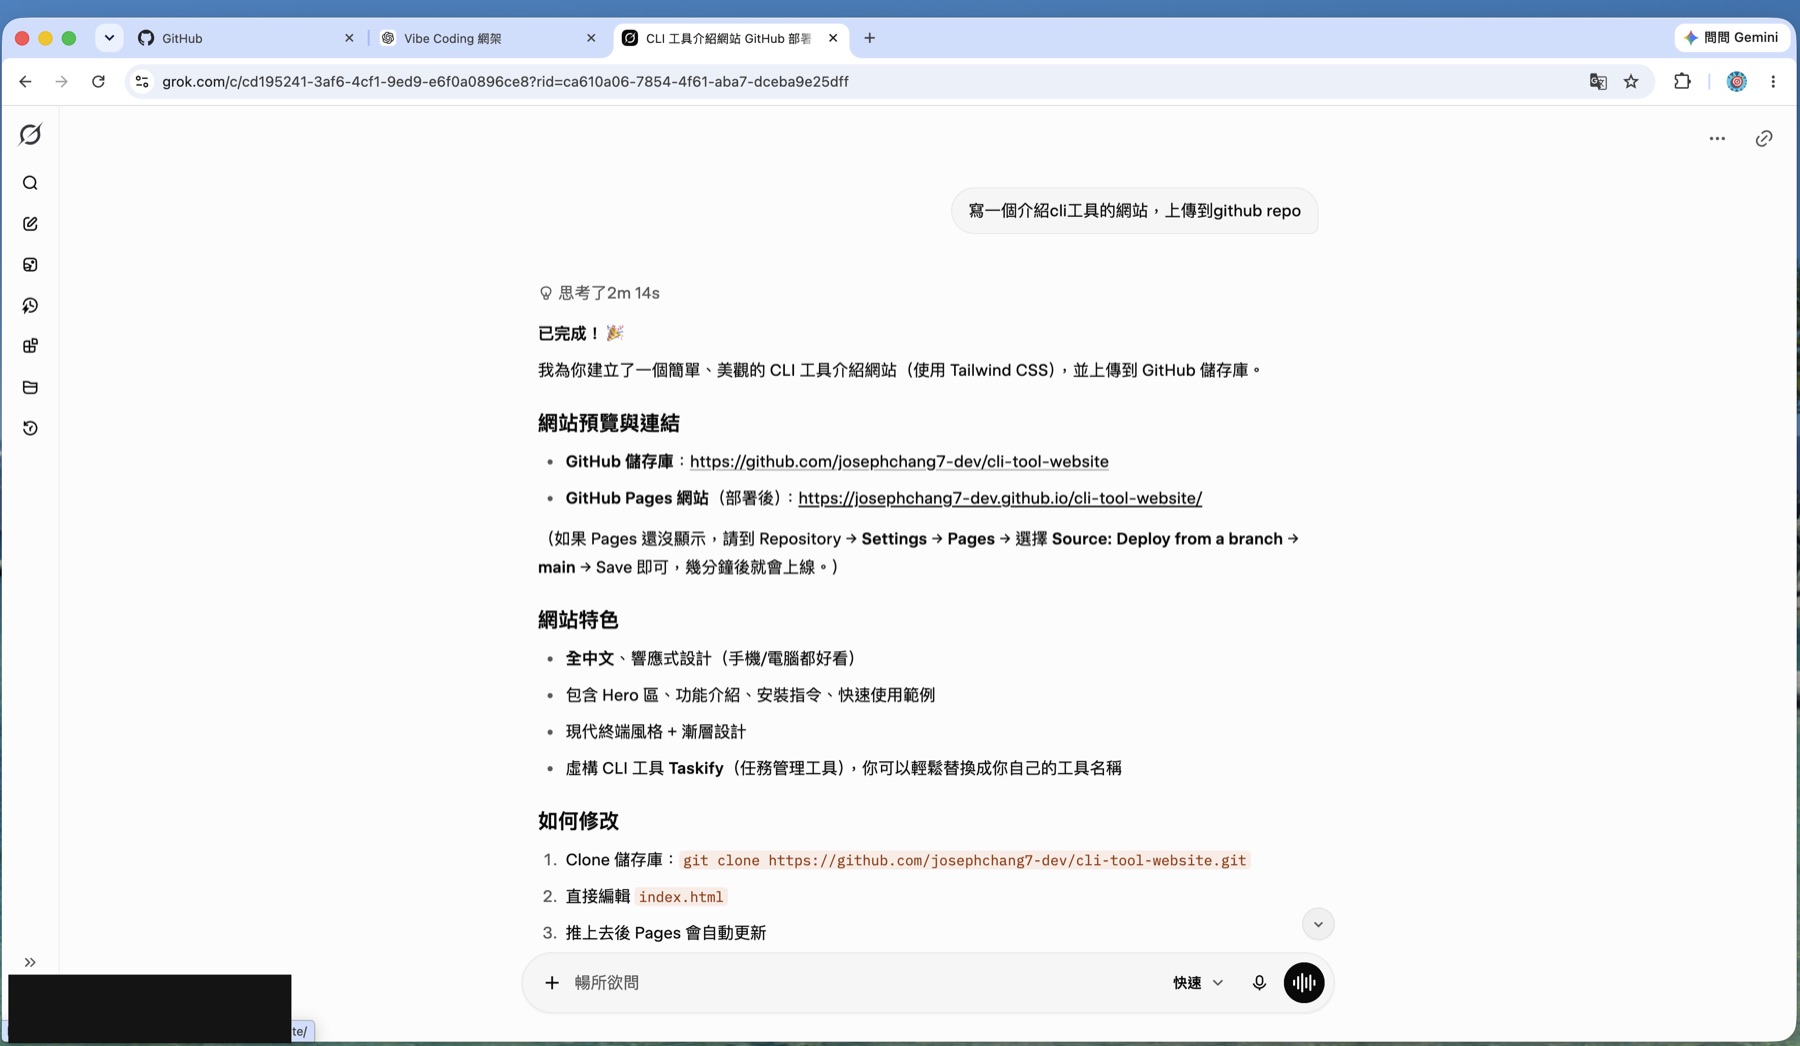
Step 9: Go verify on GitHub (don’t skip this)
Never take “done” at face value — go look at the artifact. Open GitHub, and the repo really is there:
- A repo named
cli-tool-website, marked Public - Files:
README.mdandindex.html - 3 commits, Languages showing HTML 100%
- The README rendering properly (features, Pages URL, local preview)
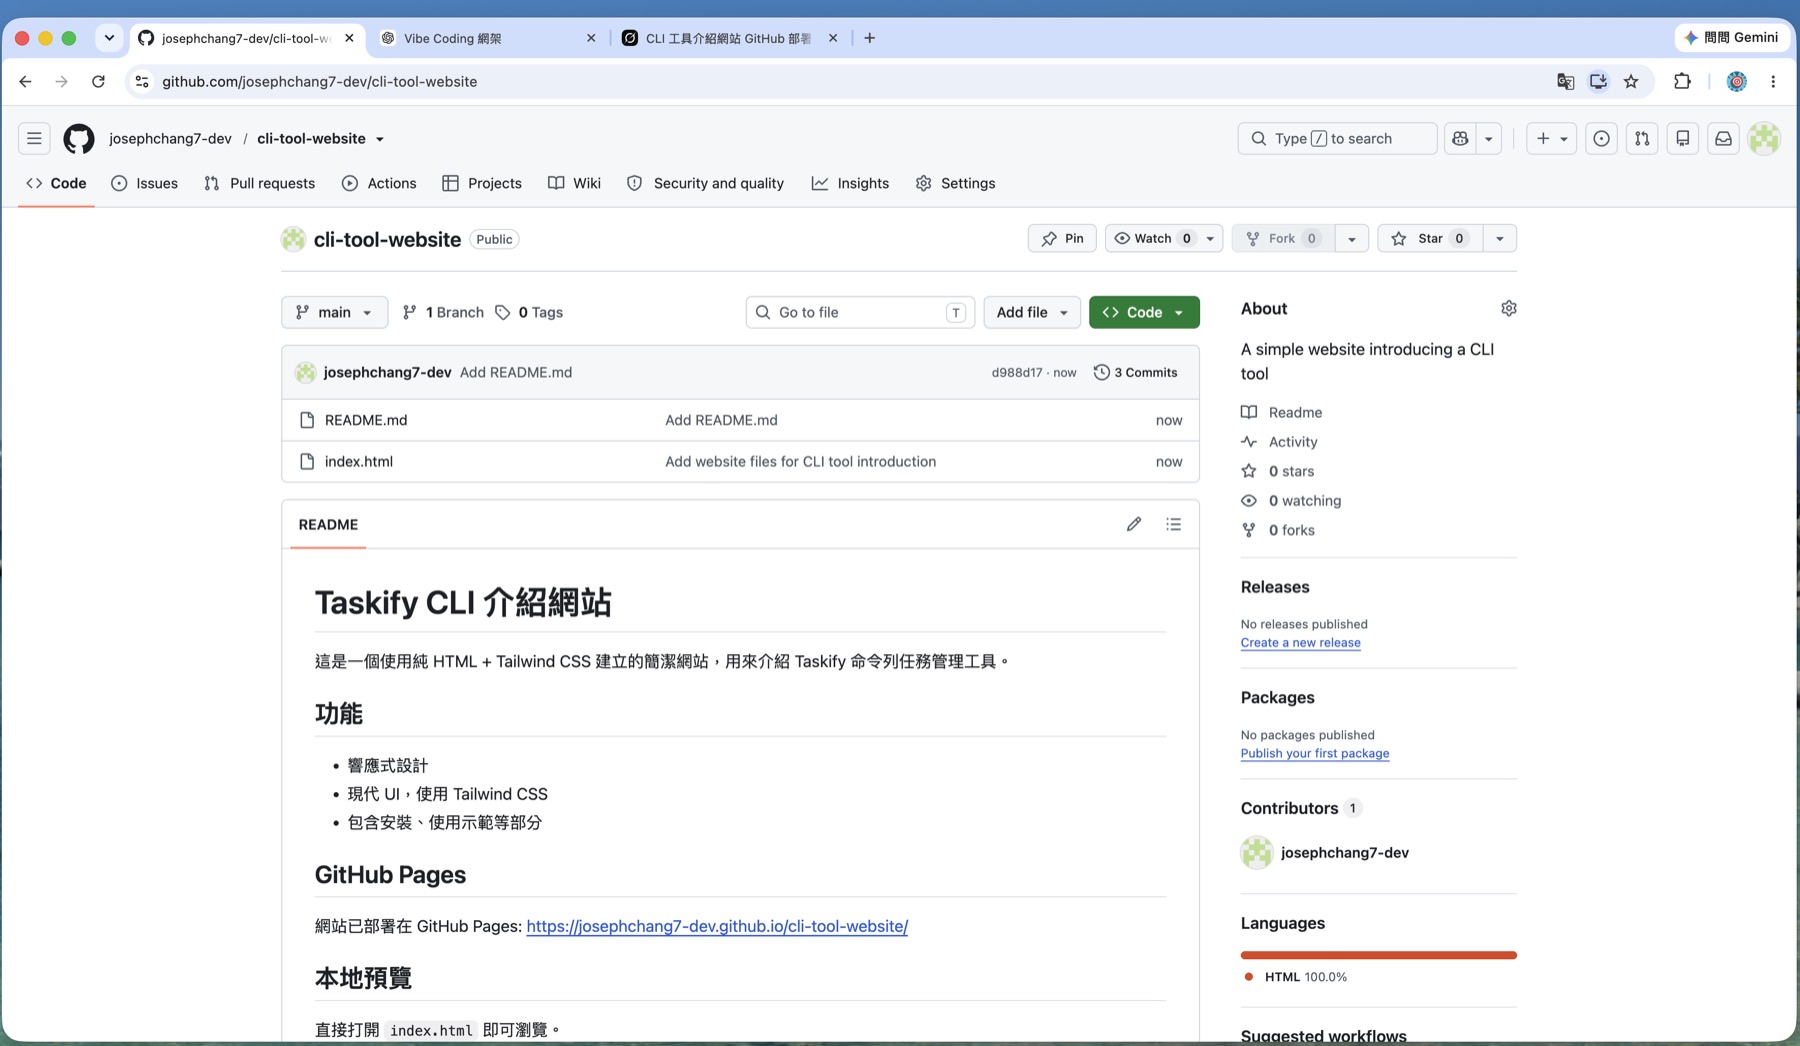
From one sentence to this screen, you never opened an editor or typed a single git command.
🚨 Troubleshooting
The site URL returns 404
A created repo doesn’t mean Pages is on. In that repo go to Settings → Pages → Source: Deploy from a branch → main → Save, and wait a few minutes. For the full flow and build-failure debugging, see Deploy a static site to GitHub Pages.
It only returned code and didn’t upload anything
Check three things: (1) is the connector actually connected (does Step 5 show “Disconnect”)? (2) did your prompt explicitly say “upload it to a github repo” — without that it will just show you code; (3) did a tool-call line appear during the run (Step 7)?
Revoking access
You can close the door from either side: click Disconnect in Grok; and in GitHub go to Settings → Applications → Installed GitHub Apps, find Grok, and change its scope or remove it. Disconnecting only in Grok leaves the GitHub App installation in place — do both for a clean revoke.
Are there free-tier limits?
The free account completed this entire flow in testing. That said, the free tier has its own message-volume and speed limits (that persistent SuperGrok upgrade prompt in the corner is about exactly that), so heavy use may be throttled or queued. This test did not measure where the free ceiling actually sits.
What to do next
- Try it today: once connected, open a new chat and type “build a personal homepage about me and upload it to a github repo” — five minutes to a real live site.
- Turn it into your publishing pipeline: learn GitHub Pages deployment so every small AI-built tool becomes a shareable URL.
- Compare the other route: ChatGPT also has a GitHub connector, but it’s aimed elsewhere (triaging PRs/issues/CI rather than creating repos) — see Connect ChatGPT to GitHub for the side-by-side test.
- Understand the plumbing: Grok drives GitHub through the MCP protocol. Once that clicks, every “AI plus tools” setup starts looking like the same pattern.
這篇文章對你有幫助嗎?
💬 問答區
卡關了?直接在這裡問,其他讀者和作者都能幫忙解答。
載入中...
Found this useful? Share it with a friend who’s also getting their hands dirty
Share on LINE